⚡ Quick Verdict: How to Set Up a Chatbase Human Handoff
To route Chatbase escalations to your human support team (via Slack, CRM, or email), you must configure a Custom Action and a webhook automation. Here is the exact 4-step process:
- Create a Catch Hook: Generate a webhook URL in an automation platform like Zapier or Make.com.
- Configure Chatbase Custom Actions: In the Chatbase dashboard, create a “Server” Custom Action. Set the API method to POST, paste your Zapier URL, and require the AI to collect the
customerEmailinput. - Fetch the Chat Transcript: In Zapier, add a GET request to the Chatbase v2 API (
/users/{userId}/conversations) to pull the user’s full chat history. - Route to Your Team: Add a Slack or Gmail action in Zapier to instantly send the user’s email and the full chat transcript to your human agents.
This API workflow ensures your customers are never trapped in an AI loop while keeping your team in the tools they already use.
If you are using Chatbase as your primary AI chatbot in 2026, you already know it is an incredibly powerful Retrieval-Augmented Generation (RAG) engine. However, when a customer gets frustrated and asks to speak to a human, you need a flawless escalation protocol.
In 2026, Chatbase introduced a native “Takeover” inbox and an “Escalate to Human” Custom Action that natively supports enterprise helpdesks like Zendesk and Salesforce.
But what if you are a small business? You likely do not want to force your team to monitor yet another isolated dashboard inside Chatbase, and you probably don’t pay for enterprise Salesforce licenses. Before configuring advanced API automations, ensure you have selected the right foundational platform by reviewing our architectural breakdown of Chatbase vs. Tidio.
The most efficient way to manage support is to route Chatbase escalations directly into the tools your team already uses every day: Slack, a custom CRM, or Gmail.
This tutorial breaks down exactly how to configure Chatbase Custom Actions to trigger a Zapier or Make.com webhook, retrieve the full chat history via API, and ping your support team instantly.
Maybe this guide will help you AI data loss prevention software to stop shadow AI leakage
Setting Up the Custom Action in Chatbase
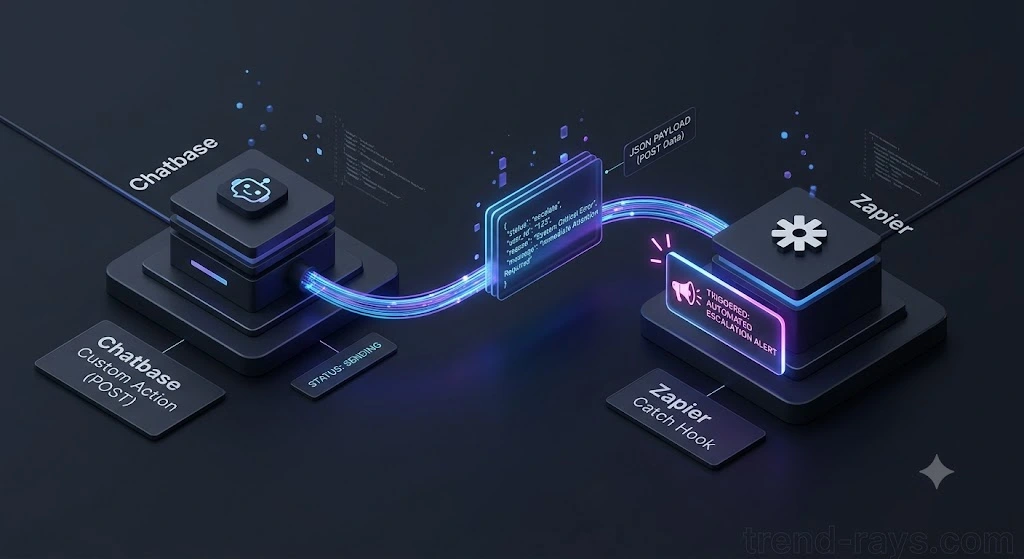
We no longer need to rely on “system prompt tricks” to trigger a handoff. Chatbase’s Custom Actions feature allows the AI to recognize an escalation request and fire a JSON payload directly to your webhook URL.
First, you need to generate a webhook URL. Open Zapier, create a new Zap, and select Webhooks by Zapier -> Catch Hook. Copy the provided URL.
Next, configure the action inside Chatbase:
- Open your Chatbase Dashboard and navigate to your bot’s Actions tab.
- Click Create Custom Action.
- Action Type: Select
Server. (This tells the bot to send data to an external API invisibly). - General Setup:
- Action Name:
Trigger_Custom_Escalation - When to use: “Use this action when the user explicitly asks to speak to a human, expresses deep frustration, or when the AI cannot resolve the issue after multiple attempts.”
- Action Name:
- API Configuration:
- Method:
POST - API Endpoint: Paste your Zapier Webhook URL here.
- Method:
- Data Inputs: Instruct the AI to collect specific data before firing the webhook. Add
customerEmailandcustomerIssueSummaryas required inputs.
When the user asks for a human, the Chatbase AI will automatically pause, collect their email, and send a clean JSON payload directly to Zapier.
The “Why” & The Business ROI (Place this right after the Quick Verdict)
Why You Need a Custom Webhook (The “Human-in-the-Loop” Advantage)
While Chatbase recently introduced a native “Escalate to Human” action that connects directly to enterprise tools like Zendesk or Salesforce, many small businesses do not use these expensive, heavyweight platforms. Instead, they run their operations out of a Slack workspace or a shared Gmail inbox.
Building a custom webhook handoff gives small businesses three massive advantages:
- Zero Dashboard Fatigue: Your human team shouldn’t have to monitor a separate Chatbase live-chat dashboard all day just waiting for a ticket. Webhooks push the ticket directly into the Slack channel your team already has open, centralizing your communications.
- Eliminates “Chatbot Rage Quits”: When an AI loops helplessly because it doesn’t know the answer, customers abandon the site. A webhook handoff immediately de-escalates the situation by assuring the customer a human has been alerted.
- Massive Cost Savings: Instead of paying $100+/month per agent for Intercom or Zendesk seats just to handle occasional AI fallbacks, you can use a $20/month Zapier account to route tickets into your free Slack channels.
The “When” (Place this right before Step 1)
Strategic Escalation: When Should the AI Handoff?
You don’t want your webhook firing every time a user says “Hello.” You must strategically define your escalation thresholds inside your Chatbase Custom Action settings.
The most effective escalation triggers for small businesses include:
- The Frustration Threshold: If the bot fails to resolve the user’s intent after two consecutive replies, it should automatically trigger the handoff.
- High-Value Keywords: Instruct the AI to instantly escalate if the user types words like “Refund,” “Cancel subscription,” or “Talk to sales.”
- VIP Lead Tagging: If you are passing custom variables to the bot (like a user’s pricing tier), you can instruct the AI to always bypass the chatbot and trigger the Slack webhook immediately if an “Enterprise” tier customer logs in.
The Common Pitfalls (Place this right after Step 4)
Troubleshooting: Common Webhook Failure Points
If your Slack channel is completely silent—or worse, getting spammed with hundreds of notifications—check these common failure points:
- The Infinite Loop: If you don’t explicitly tell the AI to stop replying after it fires the webhook, it might continue trying to answer the user’s question, triggering the webhook over and over. Always add the instruction: “After triggering the action, output a final message (‘A human is reviewing this’) and cease further responses.”
- Missing the API Chat History: Remember, the basic Zapier trigger only catches the user’s email. If your Slack alert arrives without the chat context, it means you skipped the crucial Step 2 (The v2 API GET Request) in this tutorial. You must pull the array from
/users/{userId}/conversationsso your human agents aren’t flying blind. - Native Slack Integration Confusion: Do not confuse this webhook setup with Chatbase’s “Native Slack Integration.” The native integration is designed to let your employees talk to the AI inside Slack (like an internal wiki). It is not designed to route website customer support tickets to your team. For that, you need this custom webhook.
Retrieving the Full Chat History (The API Secret)
Here is where most beginner tutorials fail: the basic webhook payload above only sends the user’s email and a brief summary. It does not send the full back-and-forth chat transcript. If your human agent receives the ticket without the transcript, they will have to ask the customer to repeat themselves—destroying the customer experience.
To solve this, developers must use the Chatbase v2 API endpoint within the automation flow to fetch the actual transcript.
In your automation platform (Zapier or Make.com), add a second step immediately after the webhook trigger:
- App: Select Webhooks by Zapier -> Custom Request (or the HTTP module in Make.com).
- Method:
GET - URL:
[https://www.chatbase.co/api/v2/agents/](https://www.chatbase.co/api/v2/agents/){YOUR_AGENT_ID}/users/{userId}/conversations(Map theuserIddynamically from the initial webhook payload). - Headers:
Authorization:Bearer YOUR_CHATBASE_API_KEYContent-Type:application/json
This API call pulls the entire conversation array, allowing you to pass the exact, word-for-word chat history to your human agent in the next step.
The Final Action: Routing to Slack
Now that your automation tool has caught the escalation request and pulled the full chat transcript, you must route it to where your human team works.
1.Add the Slack Action Step:
Add a final step in Zapier and search for Slack. Select the event “Send Channel Message.”
2.Select the Support Channel:
Choose your designated triage channel (e.g., #support-escalations or #tier-2-tickets).
3.Format the Alert Payload:
Draft the message using Zapier’s dynamic variables to give your team immediate context. Format it like this:
🚨 New AI Escalation 🚨
User Email: {{customerEmail}}
AI Summary: {{customerIssueSummary}}
Full Transcript: {{data.messages}} (Mapped from the API step)
4.Publish and Test:
Publish the workflow. Open your website widget, type “I need to speak to a human,” and verify the payload drops cleanly into your Slack channel.
Zapier vs. Make.com vs. n8n for Chatbase
While this tutorial uses Zapier for its accessibility, scaling an AI chatbot can get expensive quickly. If your bot handles high volumes of traffic, you should evaluate the middleware platform carrying your webhooks:
- Zapier: The easiest to set up, but the most expensive at scale. Fetching the API chat history requires a multi-step Zap, forcing you onto their paid premium tiers.
- Make.com: Visually superior for mapping complex JSON arrays. Make’s HTTP modules handle the Chatbase API transcript retrieval much more elegantly than Zapier, and it is significantly cheaper per execution.
- n8n: The developer’s choice. Because n8n is open-source and can be self-hosted, you can process tens of thousands of Chatbase webhook escalations for virtually zero monthly cost.
Understanding Your Automation Middleware: Zapier vs. Make.com vs. n8n
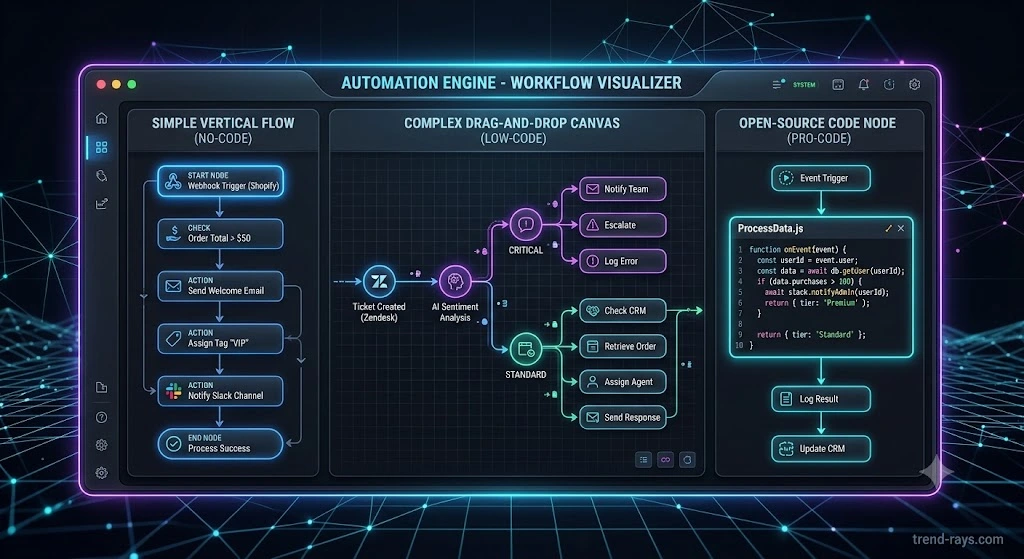
To connect Chatbase to your team’s Slack or CRM, you need a “middleware” platform. These are no-code/low-code tools that act as the digital glue between disconnected software.
The market is dominated by three main players. Choosing the wrong one can mean the difference between paying $20 a month or $500 a month for the exact same workflow.
Zapier: The Mainstream Giant (Best for Beginners)
What it is: Zapier is the most famous cloud automation platform on the internet. It uses a very simple, linear “If This, Then That” model called a “Zap.” It boasts the largest ecosystem in the world, connecting over 7,000 different apps.
- How to use it for Chatbase: You set up a single vertical flow. The top block is your “Trigger” (Catch the Chatbase Webhook). The middle block is the “Filter” (Only continue if the user asked for a human). The bottom block is the “Action” (Send a Slack message).
- The Advantage: Zero technical skills required. You can build a Chatbase handoff in under 5 minutes without ever seeing a line of code.
- The Catch (Task-Based Pricing): Zapier charges per Task (every single action your Zap successfully completes). If your Chatbase bot escalates 500 tickets a month, and your Zap has 4 steps, you just burned 2,000 tasks. Zapier becomes incredibly expensive at scale.
Make.com: The Visual Powerhouse (Best for Growing Teams)
What it is: Formerly known as Integromat, Make.com is a highly visual workflow builder. Instead of Zapier’s rigid vertical list, Make gives you a 2D infinite canvas where apps are circular “modules” connected by drag-and-drop physical lines.
- How to use it for Chatbase: Make excels at branching logic. You can build a “Router” module. If the Chatbase payload says the user is asking about “Pricing,” Make routes the Slack message to the Sales channel. If the payload says “Bug,” it routes the webhook to the IT channel.
- The Advantage (Visual Data & Operations): Make allows you to literally see the JSON data flowing between the modules, making it much easier to debug API errors. Furthermore, Make charges by Operations, and they offer significantly more volume on their base $9/mo tier compared to Zapier.
- The Catch: There is a steeper learning curve. Understanding how Make handles “arrays” and “bundles” of data takes a few hours of YouTube tutorials.
n8n: The Developer’s Darling (Best for High Volume & Privacy)
What it is: n8n (pronounced “n-eight-n”) is a “fair-code” workflow automation tool. It uses a node-based interface similar to Make, but its superpower is that it can be self-hosted on your own private company servers, and it natively supports advanced AI frameworks like LangChain.
- How to use it for Chatbase: You connect Webhook nodes and HTTP Request nodes. If a native integration doesn’t exist for your custom CRM, a developer can instantly toggle a node into “Code View” and write custom JavaScript or Python to parse the Chatbase data exactly as needed.
- The Advantage (Execution Pricing & Privacy): The 2026 pricing model of n8n is revolutionary. If you use their cloud version, they bill per Execution (meaning one entire workflow run counts as 1 unit, regardless of whether it has 2 steps or 50 steps). If you self-host n8n on your own AWS or DigitalOcean server, you get unlimited executions for $0/month software cost. Because the data never leaves your server, it is also the only viable choice for healthcare or financial businesses with strict data privacy laws.
- The Catch: It requires an engineering mindset. Setting up self-hosted n8n requires DevOps knowledge, Docker, and server maintenance.
Is There a Better Way?
Building custom webhooks and pulling API conversation logs is an incredibly powerful way to force Chatbase into your existing operational stack. However, it is an asynchronous handoff. The user is still forced to leave your website and wait for an email reply from your Slack team.
If you are running an e-commerce store (like Shopify) where forcing a customer to wait for an email means losing a sale, you may need a completely different architecture.
If seamless, real-time human handoffs within the same chat bubble are critical to your business, a routing engine might serve you better than a vector database. Read our complete architectural breakdown of Chatbase vs. Tidio here to see which setup is right for your specific tech stack.
Conclusion: Which Handoff Path Is Right for Your Business?
Building a custom webhook using Chatbase Custom Actions and Zapier is a powerful solution, but it isn’t a one-size-fits-all answer. To ensure you don’t waste time or money, follow this simple rule of thumb:
1. Stick with this Webhook Setup if:
- You run a B2B SaaS, Agency, or Tech Platform: Your customers are looking for deep technical answers from manuals or documentation. They don’t expect an instant 5-second live reply for complex issues and are perfectly happy receiving a detailed follow-up email from your team within an hour.
- Your team already lives in Slack or Teams: You want to avoid forcing your team to monitor a separate live chat dashboard all day.
2. Switch to an Omnichannel Platform (like Tidio) if:
- You run an E-Commerce or Shopify Store: When an e-commerce buyer asks a question at checkout, forcing them to wait for an email reply means losing the sale. You need a platform where a human agent can take over the live chat bubble on screen in real time.
The Cost-Saving Execution Rule:
- Fewer than 100 escalations/month: Use Zapier. It is the easiest to set up and requires zero code.
- More than 500 escalations/month: Switch the webhook to Make.com or n8n. Zapier’s multi-step task fees will scale quickly, while Make.com and self-hosted n8n will process those exact same API calls for a fraction of the cost.
By pairing Chatbase’s superior RAG AI with this webhook automation, you get the best of both worlds: automated 24/7 support that handles 90% of tickets, and a clean, direct line to your human team when it matters most.
Still unsure which software fits your tech stack? Read our full Chatbase vs. Tidio architectural comparisonto see a complete breakdown of features, hidden API fees, and live chat capabilities.
Frequently Asked Questions
Can I use Chatbase Custom Actions on the free plan?
No. As of 2026, Chatbase Custom Actions and API webhooks are restricted to paid tiers. If you are on the free sandbox tier, the bot will ignore the action trigger and continue answering normally.
How do I fetch the full Chatbase chat history in Zapier?
A standard Zapier webhook trigger only catches the user’s email and a summary payload. To get the full chat history, you must add a “Custom Request” step in Zapier (using the GET method) to hit the Chatbase v2 API endpoint: [https://www.chatbase.co/api/v2/agents/](https://www.chatbase.co/api/v2/agents/){YOUR_AGENT_ID}/users/{userId}/conversations.
Is Make.com cheaper than Zapier for Chatbase webhooks?
Yes. Zapier charges per “Task” (meaning a 3-step Chatbase escalation burns 3 tasks). Make.com charges per “Operation” but provides significantly higher volume limits on their base $9/mo tier, making it much more affordable for high-traffic AI chatbots.